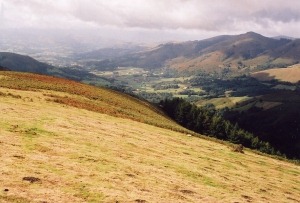
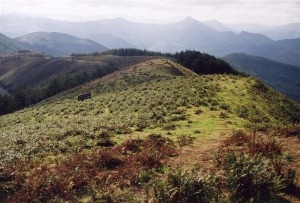
In the aftermath of his overwhelming victory at Vitoria on 21st June 1813, Wellington resisted any temptation to pursue the shattered French army across the Pyrenees into France. He opted instead to consolidate by laying siege to the remaining French fortresses at San Sebastián and Pamplona, while guarding against the threat of counter-attack by a French army which was vigorously reorganizing and refitting under its new commander, Marshal Nicolas Soult. Wellington's problem was that Soult could choose to strike along any of three routes through the Pyrenees: the most obvious was the coastal road through Irun; the others were the mountain passes at Maya and Roncesvalles. Close to midday on 25th July, Wellington left his headquarters at Lesaca for San Sebastián, where an assault on the fortress had failed earlier in the day. He left before word reached headquarters that Soult had chosen the same day to launch attacks at both Maya (D'Erlon's Corps) and Roncesvalles (Clausel's Corps). The defence of the Maya pass - entrusted to Maj.-Gen. William Stewart - depended on retaining control of the broad, grassy ridge that runs between the Aretesque peak in the east and the Alcurrunz peak in the west. Following the ridge for much of its length is a track known as the Chemin des Anglais. Stewart held the west end of the ridge with Cameron's Brigade, but was negligent in his deployment of Pringle's Brigade to defend the east end of the ridge: a picquet of only 80 men was stationed on the Aretesque peak, where dead ground to the north-east allowed the enemy to approach to within less than a kilometer before being seen; aside from four light companies, the remainder of Pringle's Brigade was an hour's march away, 4km to the rear towards Maya.
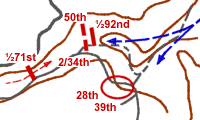
At about 9am one of Pringle's staff officers had sufficient misgivings to order the light companies to reinforce the picquet on Aretesque. Some 1½-2 hours later, firing broke out as patrols sent forward from Aretesque came up against the head of Darmagnac's Division. As the patrols fell back, Darmagnac launched 8 light companies into an attack on Aretesque. Sometime over the next 30 minutes, alarm guns were fired by a Portuguese artillery battery. Only now did Pringle send forwards - in piecemeal fashion - the 2/34th, 39th, and 28th; Cameron had already ordered the 50th eastwards along the ridge. The light companies on Aretesque held out for 45 minutes until they were overwhelmed after being enveloped by Darmagnac's battalions. As Darmagnac pushed onto the ridge, his left flank came under attack from the 2/34th, the first of the battalions to arrive from the direction of Maya. Meanwhile his right flank column had been thrown back along the ridge by the 50th. The British infantry gradually came into some semblance of a line with the 50th and 2/34th on the left, and the 28th and 39th on the right. A furious action at close quarters followed. With Darmagnac's Division on the east of the ridge - now supported by Abbé's Division - a third French division under Maransin began to move against Cameron's position at the west end of the ridge. Cameron prepared to hold off Maransin with the 71st and one wing of the 92nd, while releasing the other wing of the 92nd on Pringle's orders to help fend off Darmagnac. Darmagnac finally broke through the British line, pushing the 28th and 39th back down into the valley, while the 50th and 2/34th were forced westwards along the ridge until they met the advancing Highlanders of the 92nd. Now the 92nd took up the fight, their 400 muskets facing more than 3,000 of the enemy. For more than 20 minutes, ferocious musketry fire from each side tore into the other at a range of little more than 100m. While accounts speak of the French dead lying literally in heaps, the Highlanders' line was itself shattered. More than half the men in the 92nd were killed or wounded. With retreat inevitable, the senior of the two surviving officers of the 92nd ordered the Highlanders to fall back. Darmagnac pressed onwards, forcing the 2/34th off the ridge before being held up once more as the British lines were reinforced by another half-battalion, of the 71st, detached from the west end of the ridge. Gradually, Darmagnac again prevailed. By this time - around 2pm - the situation was becoming critical as Maransin exerted pressure against the two half-battalions holding the west end of the ridge. It was only now that Stewart appeared on the scene, having left the area early before the French assault began. Stewart gave orders to withdraw from the ridge, abandon the pass, and to prepare to fight a delaying action across the main road south until the arrival of reinforcements. Despite the arrival on the scene of the 82nd - the nearest battalion of 7th Division - Stewart was gradually forced back down the road, and was on the verge of ordering a disengagement when at around 6pm Barnes' Brigade of 7th Division began to arrive; the 1/6th and the Brunswick-Oels drove in the leading French battalions, carrying Stewart's infantry forward again in their wake. As a result, Maransin fell back a distance of 1½km to the pass. D'Erlon undoubtedly still held the advantage, but chose to concentrate his forces on the ridge overnight rather than to renew the offensive. Following news of Cole's retreat at Roncesvalles, there was no choice but to withdraw. After midnight, Barnes and Stewart began the retreat to Elizondo (Baztan) and across the upper Bidassoa. British losses on the day totalled 1,484 out of 6,000 engaged; French casualties are estimated to have been 2,100 out of the 20,000 present. A gem of a battlefield, though not easy of access. Driving south along the N121A towards Pamplona, take the left turn at Oronoz to follow the N121B along the Baztán valley towards the French border. 6km after the right turn to Maya del Baztán (Amaiur), turn right on the minor road signposted to Gorramendi. The road follows the lower slopes of the Maya ridge. After 2.7km, a track to the left is signposted to Burkaitz. There is good parking 200m further on. Return to the track on foot, follow it until it crosses the Chemin des Anglais from which point you will see a clear grassy path bearing left uphill as far as the summit, the eastern end of the ridge. From the summit, there is a fine view along the ridge. Follow the ridge line across the second, lower, summit onto the narrow plateau beyond where the worst of the fighting took place. The view from here down the Baztán valley is spectacular. "With Wellington in the Pyrenees" by Maj.-Gen. F. C. Beatson, published by Tom Donovan Publishing 1993, ISBN 1871085160. "A History of the Peninsular War, Volume VI" by Sir Charles Oman, published by Greenhill Books 1996, ISBN 1853672262. "Wellington in the Peninsula 1808-1814" by Jac Weller, published by Greenhill Books 1999, ISBN 1853673811. Map of the Battle of Maya courtesy of The Napoleon Series. Notes I have generally followed Beatson's account of the battle. As Oman notes, however, the original sources contradict each other, leaving considerable doubts as to the precise course of events. © Andrew C Jackson 2006
|